The Brane SDK provides developers with multiple programming models to efficiently leverage a diverse range of hardware architectures. This flexibility allows you to optimize your application for specific target platforms while maintaining a consistent development experience across the SDK.
This guide explores the main programming models supported by the Brane SDK, with a primary focus on OpenCL and supplementary information about other supported models. Each section provides conceptual background, practical implementation details, and optimization strategies to help you choose the right approach for your specific needs.
OpenCL: Cross-Platform Parallel Computing #
OpenCL (Open Computing Language) serves as the primary programming model in the Brane SDK. It provides a standardized way to write code that can execute efficiently across CPUs, GPUs, and specialized accelerators like Kalray MPPA. The key advantage of OpenCL is its portability – code written once can run on hardware from different vendors with minimal modifications.
Understanding the OpenCL Architecture #
OpenCL’s architecture is designed around a clear separation between the host system (typically your CPU) that coordinates execution and the various compute devices that perform parallel processing. This separation creates a flexible framework that can adapt to different hardware configurations.
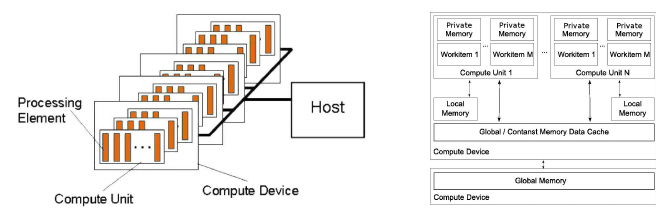
Platform Model: A Hierarchical Approach #
OpenCL organizes computation resources in a hierarchical structure:
| Level | Description |
|---|---|
| Host | Executes application logic, manages memory, and launches kernels. |
| Compute Device | A CPU, GPU, or accelerator that executes OpenCL kernels. |
| Compute Unit (CU) | A collection of processing elements (PEs) that execute kernel threads. |
| Processing Element (PE) | The smallest unit of computation in OpenCL, capable of executing SIMD instructions. |
This hierarchy allows OpenCL to scale from simple single-CPU systems to complex multi-GPU clusters while maintaining a consistent programming model. Or more graphically (credit: Luca Mussi):
Execution Model #
OpenCL programs consist of two distinct components:
- Host Code: Written in standard C or C++, this component runs on the CPU and orchestrates the overall execution flow.
- Kernel Code: Special functions written in OpenCL C (based on C99) that execute on compute devices.
The host code is responsible for setting up the environment, managing memory, and coordinating kernel execution, while the kernels perform the parallel computation.
The Execution Flow #
A typical OpenCL application follows this sequence:
- Platform and Device Discovery: The host queries available platforms and devices
- Context Creation: The host establishes a context for one or more devices
- Command Queue Creation: One or more command queues are created for the devices
- Memory Allocation: Buffers are allocated in device memory
- Program Building: OpenCL kernel source is compiled for the target device
- Kernel Arguments: Parameters are set for the kernel execution
- Kernel Execution: Work is submitted to the command queue
- Result Retrieval: Results are read back from device memory
- Cleanup: Resources are released
Let’s walk through a concrete example to illustrate these steps.
Example: Vector Addition in OpenCL #
First, let’s look at the kernel code that will perform our parallel vector addition:
// OpenCL kernel for vector addition
__kernel void vector_add(__global const float* A, __global const float* B, __global float* C) {
    int id = get_global_id(0);
    C[id] = A[id] + B[id];
}
Now, here’s the host code (simplified) that sets up and executes this kernel:
#include <CL/cl.h>
#include <iostream>
#include <vector>

// Function to check OpenCL errors
void checkError(cl_int error, const char* message) {
    if (error != CL_SUCCESS) {
        std::cerr << message << " (Error code: " << error << ")" << std::endl;
        exit(EXIT_FAILURE);
    }
}

int main() {
    // Problem size
    const int VECTOR_SIZE = 1024;

    // Input/output vectors
    std::vector<float> h_A(VECTOR_SIZE, 1.0f);  // Initialize with 1.0
    std::vector<float> h_B(VECTOR_SIZE, 2.0f);  // Initialize with 2.0
    std::vector<float> h_C(VECTOR_SIZE);        // Output vector

    cl_int error;

    // ====== 1. Platform and Device Discovery ======

    // Get platform
    cl_platform_id platform;
    cl_uint numPlatforms;
    error = clGetPlatformIDs(1, &platform, &numPlatforms);
    checkError(error, "Failed to get platform ID");

    // Get device
    cl_device_id device;
    cl_uint numDevices;
    error = clGetDeviceIDs(platform, CL_DEVICE_TYPE_ALL, 1, &device, &numDevices);
    checkError(error, "Failed to get device ID");

    // ====== 2. Context Creation ======

    cl_context context = clCreateContext(nullptr, 1, &device, nullptr, nullptr, &error);
    checkError(error, "Failed to create context");

    // ====== 3. Command Queue Creation ======

    cl_command_queue queue = clCreateCommandQueue(context, device, 0, &error);
    checkError(error, "Failed to create command queue");

    // ====== 4. Memory Allocation ======

    // Create buffers on the device
    cl_mem d_A = clCreateBuffer(context, CL_MEM_READ_ONLY | CL_MEM_COPY_HOST_PTR,
                               VECTOR_SIZE * sizeof(float), h_A.data(), &error);
    checkError(error, "Failed to create buffer A");

    cl_mem d_B = clCreateBuffer(context, CL_MEM_READ_ONLY | CL_MEM_COPY_HOST_PTR,
                               VECTOR_SIZE * sizeof(float), h_B.data(), &error);
    checkError(error, "Failed to create buffer B");

    cl_mem d_C = clCreateBuffer(context, CL_MEM_WRITE_ONLY,
                               VECTOR_SIZE * sizeof(float), nullptr, &error);
    checkError(error, "Failed to create buffer C");

    // ====== 5. Program Building ======

    // Kernel source
    const char* kernelSource = R"(
    __kernel void vector_add(__global const float* A, __global const float* B, __global float* C) {
        int id = get_global_id(0);
        C[id] = A[id] + B[id];
    }
    )";

    // Create program
    cl_program program = clCreateProgramWithSource(context, 1, &kernelSource, nullptr, &error);
    checkError(error, "Failed to create program");

    // Build program
    error = clBuildProgram(program, 1, &device, nullptr, nullptr, nullptr);
    if (error != CL_SUCCESS) {
        // Get build log if compilation failed
        size_t logSize;
        clGetProgramBuildInfo(program, device, CL_PROGRAM_BUILD_LOG, 0, nullptr, &logSize);

        std::vector<char> buildLog(logSize);
        clGetProgramBuildInfo(program, device, CL_PROGRAM_BUILD_LOG, logSize, buildLog.data(), nullptr);

        std::cerr << "Build error: " << buildLog.data() << std::endl;
        exit(EXIT_FAILURE);
    }

    // Create kernel
    cl_kernel kernel = clCreateKernel(program, "vector_add", &error);
    checkError(error, "Failed to create kernel");

    // ====== 6. Kernel Arguments ======

    error = clSetKernelArg(kernel, 0, sizeof(cl_mem), &d_A);
    error |= clSetKernelArg(kernel, 1, sizeof(cl_mem), &d_B);
    error |= clSetKernelArg(kernel, 2, sizeof(cl_mem), &d_C);
    checkError(error, "Failed to set kernel arguments");

    // ====== 7. Kernel Execution ======

    // Define global and local work sizes
    size_t globalWorkSize = VECTOR_SIZE;
    size_t localWorkSize = 64;  // Adjust based on your device capabilities

    // Launch kernel
    error = clEnqueueNDRangeKernel(queue, kernel, 1, nullptr, &globalWorkSize,
                                  &localWorkSize, 0, nullptr, nullptr);
    checkError(error, "Failed to execute kernel");

    // ====== 8. Result Retrieval ======

    // Read results back to host
    error = clEnqueueReadBuffer(queue, d_C, CL_TRUE, 0, VECTOR_SIZE * sizeof(float),
                               h_C.data(), 0, nullptr, nullptr);
    checkError(error, "Failed to read results");

    // Verify results
    bool success = true;
    for (int i = 0; i < VECTOR_SIZE; i++) {
        if (h_C[i] != 3.0f) {
            std::cout << "Verification failed at index " << i << ": "
                      << h_C[i] << " instead of 3.0" << std::endl;
            success = false;
            break;
        }
    }

    if (success) {
        std::cout << "Vector addition completed successfully!" << std::endl;
    }

    // ====== 9. Cleanup ======

    clReleaseMemObject(d_A);
    clReleaseMemObject(d_B);
    clReleaseMemObject(d_C);
    clReleaseKernel(kernel);
    clReleaseProgram(program);
    clReleaseCommandQueue(queue);
    clReleaseContext(context);

    return 0;
}
This example demonstrates the complete workflow of an OpenCL application. While it may seem verbose compared to simple CPU code, this structure provides tremendous flexibility for targeting diverse hardware platforms.
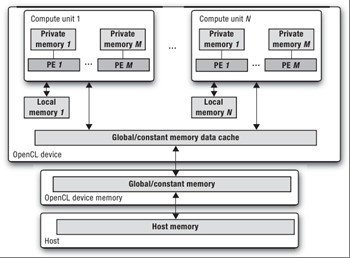
Memory Model #
Understanding and effectively managing memory is critical for achieving high performance in OpenCL applications. The OpenCL memory model defines several memory spaces, each with different visibility, size, and access characteristics:
| Memory Type | Access Scope | Latency |
| Global Memory (Host) | Accessible by all processing elements, high capacity | Highest |
| Global Memory (Device) | Accessible by on-device processing elements, high capacity | High |
| Constant Memory (Device) | Read-only memory shared among all processing elements | Medium |
| Local Memory | Shared among processing elements in the same compute unit | Low |
| Private Memory | Exclusive to a single processing element | Lowest |
Or more graphically (credit: Allan M. de Souza):
Memory Optimization Strategies #
To maximize performance, consider these memory optimization techniques:
1. Minimize Global Memory Access: Global memory has high latency, so reduce these accesses where possible
_kernel void optimized_kernel(__global float* data, __local float* local_cache) {
int local_id = get_local_id(0);
int global_id = get_global_id(0);
// Load data into local memory once
local_cache[local_id] = data[global_id];
barrier(CLK_LOCAL_MEM_FENCE);

// Now use local_cache instead of accessing global memory repeatedly
// ...
2. Use Vector Types: OpenCL provides vector types (float4, int8, etc.) that can improve memory bandwidth utilization
__kernel void vector_addition_vectorized(__global const float4* A,
__global const float4* B,
__global float4* C) {
int id = get_global_id(0);
C[id] = A[id] + B[id]; // Processes 4 elements at once
}
3. Coalesced Memory Access: Ensure work-items in a work-group access adjacent memory locations
// Good pattern: work-items access adjacent elements
int idx = get_global_id(0);
float value = data[idx];
// Poor pattern: work-items access non-adjacent elements
int idx = get_global_id(0) * STRIDE;
float value = data[idx];
4. Use Constant Memory for Static Data: Frequently accessed read-only data should be placed in constant memory
__kernel void filter(__constant float* coefficients,
__global float* input,
__global float* output) {
// Coefficients are read-only and accessed by all work-items
// …
}
5. Prefetching: Load data into local memory before it’s needed to hide memory latency
__kernel void prefetch_example(__global float* input,
__global float* output,
__local float* cache) {
int local_id = get_local_id(0);
int global_id = get_global_id(0);
// Prefetch next chunk while processing current data
cache[local_id] = input[global_id + get_local_size(0)];
barrier(CLK_LOCAL_MEM_FENCE);
// Process current data
// ...
Integration with the Brane SDK #
The Brane SDK significantly streamlines OpenCL development through build automation, simplified APIs, and comprehensive tooling for emulation and simulation.
Gradle-Based Build Automation #
At the core of the Brane SDK’s integration approach is a sophisticated Gradle-based build system that automates the entire development lifecycle. Here’s a typical build configuration:
plugins {
    //id 'com.brane.cpu.cpp-application'
    id 'com.brane.coolidge.cpp'
}

application {
    targetMachines = [
            machines.linux.x86_64,
            coolidgeMachines.clusterOS.architecture("MPPA_v1")
    ]
}
This simple yet powerful configuration enables cross-architecture development, targeting both standard x86_64 Linux systems and specialized hardware like Kalray MPPA processors. The Brane SDK Gradle plugins handle:
- Cross-compilation for different target architectures
- Automated deployment of binaries to target platforms
- Configuration of platform-specific optimizations
- Integration of simulation and emulation tools
With just a few lines of configuration, your project becomes portable across diverse hardware platforms without requiring separate build systems or manual configuration for each target. The SDK seamlessly integrates the OpenCL development process with this build system, enabling you to focus on algorithm development rather than build complexity.
OpenCL-Wrapper Integration #
The Brane SDK incorporates the OpenCL-Wrapper library (https://github.com/ProjectPhysX/OpenCL-Wrapper) as a first-party integration, providing dramatically simplified OpenCL development:
#include <brane/opencl/wrapper.hpp>

int main() {
    // Initialize OpenCL with prioritized device types
    brane::ocl::init({brane::ocl::device_type::GPU, brane::ocl::device_type::CPU});

    // Allocate host vectors
    std::vector<float> h_a(1024, 1.0f);
    std::vector<float> h_b(1024, 2.0f);
    std::vector<float> h_c(1024);

    // Create device buffers with automatic memory management
    brane::ocl::buffer<float> d_a(h_a);
    brane::ocl::buffer<float> d_b(h_b);
    brane::ocl::buffer<float> d_c(h_c.size());

    // Create and compile the kernel in one line
    brane::ocl::kernel vector_add("vector_add.cl", "vector_add");

    // Set kernel arguments with type safety
    vector_add.set_args(d_a, d_b, d_c);

    // Launch the kernel with simple syntax
    vector_add.launch_kernel({h_c.size()}, {64});

    // Read results back to host with automatic synchronization
    d_c.read(h_c);

    // Resources automatically cleaned up through RAII
    return 0;
}
This wrapper eliminates most of the boilerplate code typically associated with OpenCL development:
- Automatic memory management with RAII principles
- Type-safe kernel argument binding
- Simplified device selection and initialization
- Error handling through exceptions rather than error codes
Emulation and Simulation Tools #
The Brane SDK provides comprehensive tools for emulation and simulation that enable development and testing without physical hardware:
#include <brane/opencl/emulation.hpp>

// Configure emulation environment
brane::ocl::EmulationConfig config;
config.setDeviceType(brane::ocl::DeviceType::GPU);
config.setComputeUnits(16);
config.setWorkgroupSize(64);
config.enableMemoryTracing(true);

// Start emulation session
auto session = brane::ocl::EmulationManager::createSession(config);

// Run your OpenCL code...

// Analyze results
auto stats = session->getPerformanceStatistics();
std::cout << "Estimated execution time: " << stats.totalExecutionTimeMs << " ms" << std::endl;
std::cout << "Global memory transactions: " << stats.globalMemoryTransactions << std::endl;
The emulation tools enable:
- Testing on virtual hardware configurations
- Performance prediction across different device types
- Memory access pattern analysis
- Identification of optimization opportunities
For a complete introduction to OpenCL, visit the Khronos OpenCL Documentation.
Choosing OpenCL for Your Applications #
The Brane SDK uses OpenCL as its primary programming model, offering exceptional portability across different hardware architectures. OpenCL is particularly valuable when your application needs to execute efficiently on diverse computing platforms, from multi-core CPUs to specialized accelerators like Kalray MPPA.
The strength of OpenCL lies in its write-once, run-anywhere approach. Code written using the OpenCL standard can execute on hardware from different vendors with minimal modifications, protecting your development investment as hardware evolves. This portability doesn’t come at the expense of performance, as OpenCL provides low-level access to hardware capabilities when needed.
OpenCL’s execution model maps naturally to the parallel processing capabilities of modern hardware. By expressing computation in terms of kernels that execute across many work items, your applications can efficiently scale from small embedded systems to large compute clusters, all while maintaining a consistent programming approach.
The Brane SDK enhances OpenCL’s natural capabilities with simplified APIs, optimized runtime environments, and robust tooling. This combination makes OpenCL an excellent choice for applications ranging from high-performance computing to embedded systems with heterogeneous processing requirements.models within a single application, allowing you to use the most appropriate model for each component.
Next Steps with OpenCL #
After mastering the basics of OpenCL in the Brane SDK, consider these pathways to deepen your expertise:
- Expand on the vector addition example by implementing more complex algorithms relevant to your domain. This practical experience will strengthen your understanding of OpenCL’s execution model and memory handling capabilities.
- Try the OpenCL-Wrapper integration to experience how it simplifies development with RAII-based memory management and streamlined kernel launching. Compare both approaches to appreciate the reduction in boilerplate code.
- Explore OpenCL’s memory model more deeply by creating kernels that effectively utilize local and constant memory. Understanding these memory spaces is crucial for performance optimization.
- Use the SDK’s emulation and profiling tools to identify bottlenecks in your OpenCL code. These insights will guide your optimization efforts and help you develop more efficient algorithms.
- Connect with the Brane SDK community through forums and webinars to exchange OpenCL techniques and patterns with other developers working on similar challenges.


